Coding an EditorWindow to create default animations from sprites
In this tutorial, we will learn how to coding an EditorWindow that creates Animation Clips and Animator Override Controller from Sprites.
Introduction
Create animation clips from sprites is quite a simple operation to perform on Unity:
But in many cases, you need to repeat this operation over and over again to create other animations to the same character, like clips for idle, walk up, walk down and walk horizontal animations.
When you need to this for only one character, there is no problem, but imagine you need to create the same 4 animation clip for dozens (maybe hundreds) of characters. Besides being a boring operation, you probably will make some mistake and creating some wrong clip. In cases like that, could be a good option to create your own EditorWindow to automate those operations.
EditorWindow
To start, let’s see what Unity Manual says about EditorWindow:
You can create any number of custom windows in your app. These behave just like the Inspector, Scene or any other built-in ones. This is a great way to add a user interface to a sub-system for your game.
Making a custom Editor Window involves the following simple steps:
- Create a script that derives from EditorWindow.
- Use code to trigger the window to display itself.
- Implement the GUI code for your tool.
During this tutorial we will create a class called DefaultAnimationsEditorWindow that derives from EditorWindow, we will add a menu item to Unity Editor to allow call our EditorWindow and we will implement the GUI for the window.
Furthermore, we will implement the code that allows us to create Animation Clips and Animation Override Controller from sprites.
The idea behind DefaultAnimationsEditorWindow is that when you have a bunch o characters using the same kind of animations, they used the same structure of sprite sheets, so you can create the animations based on the sprites indexes on sprite sheet texture.

similar sprites sheets from Phantasy Star IV (Alys, Chaz and Demi). Sprites ripped by Ultimecia from The Spriters Resource
Starting with sprite to walk down and ending with the last sprite of walk horizontal, we have 9 sprites and in all sprite sheets the sprites indexes are the same:

- Idle: index 1
- Walk down: indexes 0, 1 and 2.
- Walk up: indexes 3, 4 and 5.
- Walk horizontal: indexes 6, 7 and 9.
Starter project

All the source code and assets for this tutorial are available on this GitHub repository: https://github.com/giacomelli/coding-an-editorwindow-to-create-default-animations-from-sprites. To start the tutorial you need to fork, clone or download the repository.
git clone https://github.com/giacomelli/coding-an-editorwindow-to-create-default-animations-from-sprites.git
Open the folder default-animations-editor-window-starter on Unity.
This starter project has an initial setup and assets to allow us to focus on the learning about how to code the EditorWindow.
Open the scene _Tutorial/Scenes/TutorialScene.
Hit the Play button. You should see a screen like this:
The editor window code organization
We will organize our DefaultAnimationsEditorWindow in 3 main classes:
-
DefaultAnimationsEditorWindow: where is the menu and GUI for our editor window.
-
DefaultAnimationsSettings: this is our ScriptableObject to save our settings defined on DefaultAnimationsEditorWindow.
-
DefaultAnimationsUtility: here we will implement the code used by our DefaultAnimationsEditorWindow to perform an operation. Put the operation code in a separated class not bounded by the GUI allow us to use these operations in any other script. This way to work is similar to what Unity itself use in some editor operations, like: AnimationUtility, PrefabUtility and SpriteUtility.
Besides the above classes, there are some other extension method classes on the folder Extensions that are self-explanatory and I won’t talk in details, but you can check them and read their code documentation to a better understanding.
DefaultAnimationsEditorWindow
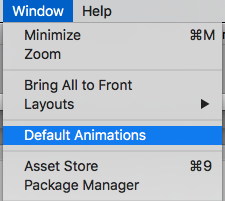
In the code bellow, we define the menu for the window through the method ShowWindow and the attribute MenuItem.

Default Animations menu item
At the OnEnable we read the settings from our ScriptableObject DefaultAnimationsSettings.
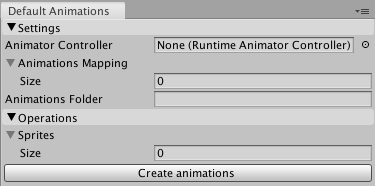
The next 3 methods just draw the components to the editor window GUI.

editor window
DefaultAnimationsSettings
There are few things to talk about this class because it is just an ordinary ScriptableObject with a couple of properties that will be serialized and used by the DefaultAnimationsUtility class, a singleton to make easier to access the settings, two methods to load/create the asset and a subclass to sprite mappings.
The most important code of this class is the property SpriteIndexes that figure out what are the sprite indexes from the sprite sheet that ClipToOverride is using.
SpriteIndexes will be used by DefaultAnimationsUtility.CreateAnimationClips to know what sprites should be used to create the new animations based on the DefaultAnimationsSettings.AnimationsMapping.
DefaultAnimationsUtility
In this class is where the heart of our editor window resides.
There are 2 important methods here: CreateAnimationClips and CreateAnimatorOverride.
CreateAnimationClips
It iterates through the AnimationsMappings defined in the editor window (saved on DefaultAnimationsSettings.AnimationsMapping), for each mapping it will call the method CreateAnimationClip.
The CreateAnimationClip creates a new AnimationClip (or load if already exists one with the same name), copying the frame rate and wrap mode from the ClipToOverride defined in the mapping. After, if wrap mode is a loop, it uses the AnimationUtility to set the loop time to the clip settings (through the extension methods).
Now is the most tricky part of this class, we need to create an EditorCurveBinding for the sprite and get the ObjectReferenceKeyframe from the ClipToOverride and create new ObjectReferenceKeyframe to our new keyframes (AnimationClipExtensions).
CreateAnimatorOverride
In this method we create AnimatorOverrideController that will override each clip from the DefaultAnimationsSettings.AnimatorController by the ClipToOverride of each mapping defined on DefaultAnimationsSettings.AnimationsMapping (AnimatorOverrideControllerExtensions).
Setup
Copy this whole Editor folder to your Assets/_Tutorial folder.
this folder is available on your local clone of the repository inside the folder default-animations-editor-window-complete/Assets/_Tutorial
Delete the DefaultAnimationsSettings scriptable object instance.
Open the editor window on menu Windows / Default Animations and configure it as showing in the video below:
Creating and using the default animations
Drag all the sprite sheets (textures) from folder Assets/_Tutorial/Sprites to the Spritesheets field and click on Create animations button:
Challenge
Try to change de editor window to allow more the one set of default animations. One way to this is by creating another ScriptableObject to save the current selected DefaultAnimationsSettings asset.
If you have any doubt how to implement any part of this challenge, feel free to ask on this post comments or send me a message.
Solution
The tutorial repository has two main folders:
- default-animations-editor-window-starter: the one you used to make this tutorial.
- default-animations-editor-window-complete: the whole solution with all scripts and assets implemented. Use this one, in case you get stuck in any item on the challenge.
Conclusion
In this tutorial, we learned how to coding a custom editor window to create a set of default animation clips and animator override controller.
Icons made by Freepik, Vignesh Oviyan and Eucalyp from www.flaticon.com is licensed by Creative Commons BY 3.0